Showing posts with label IA:13. Show all posts

Monday, April 20, 2015

Painting Progress

Ah, the lean mean grey machines


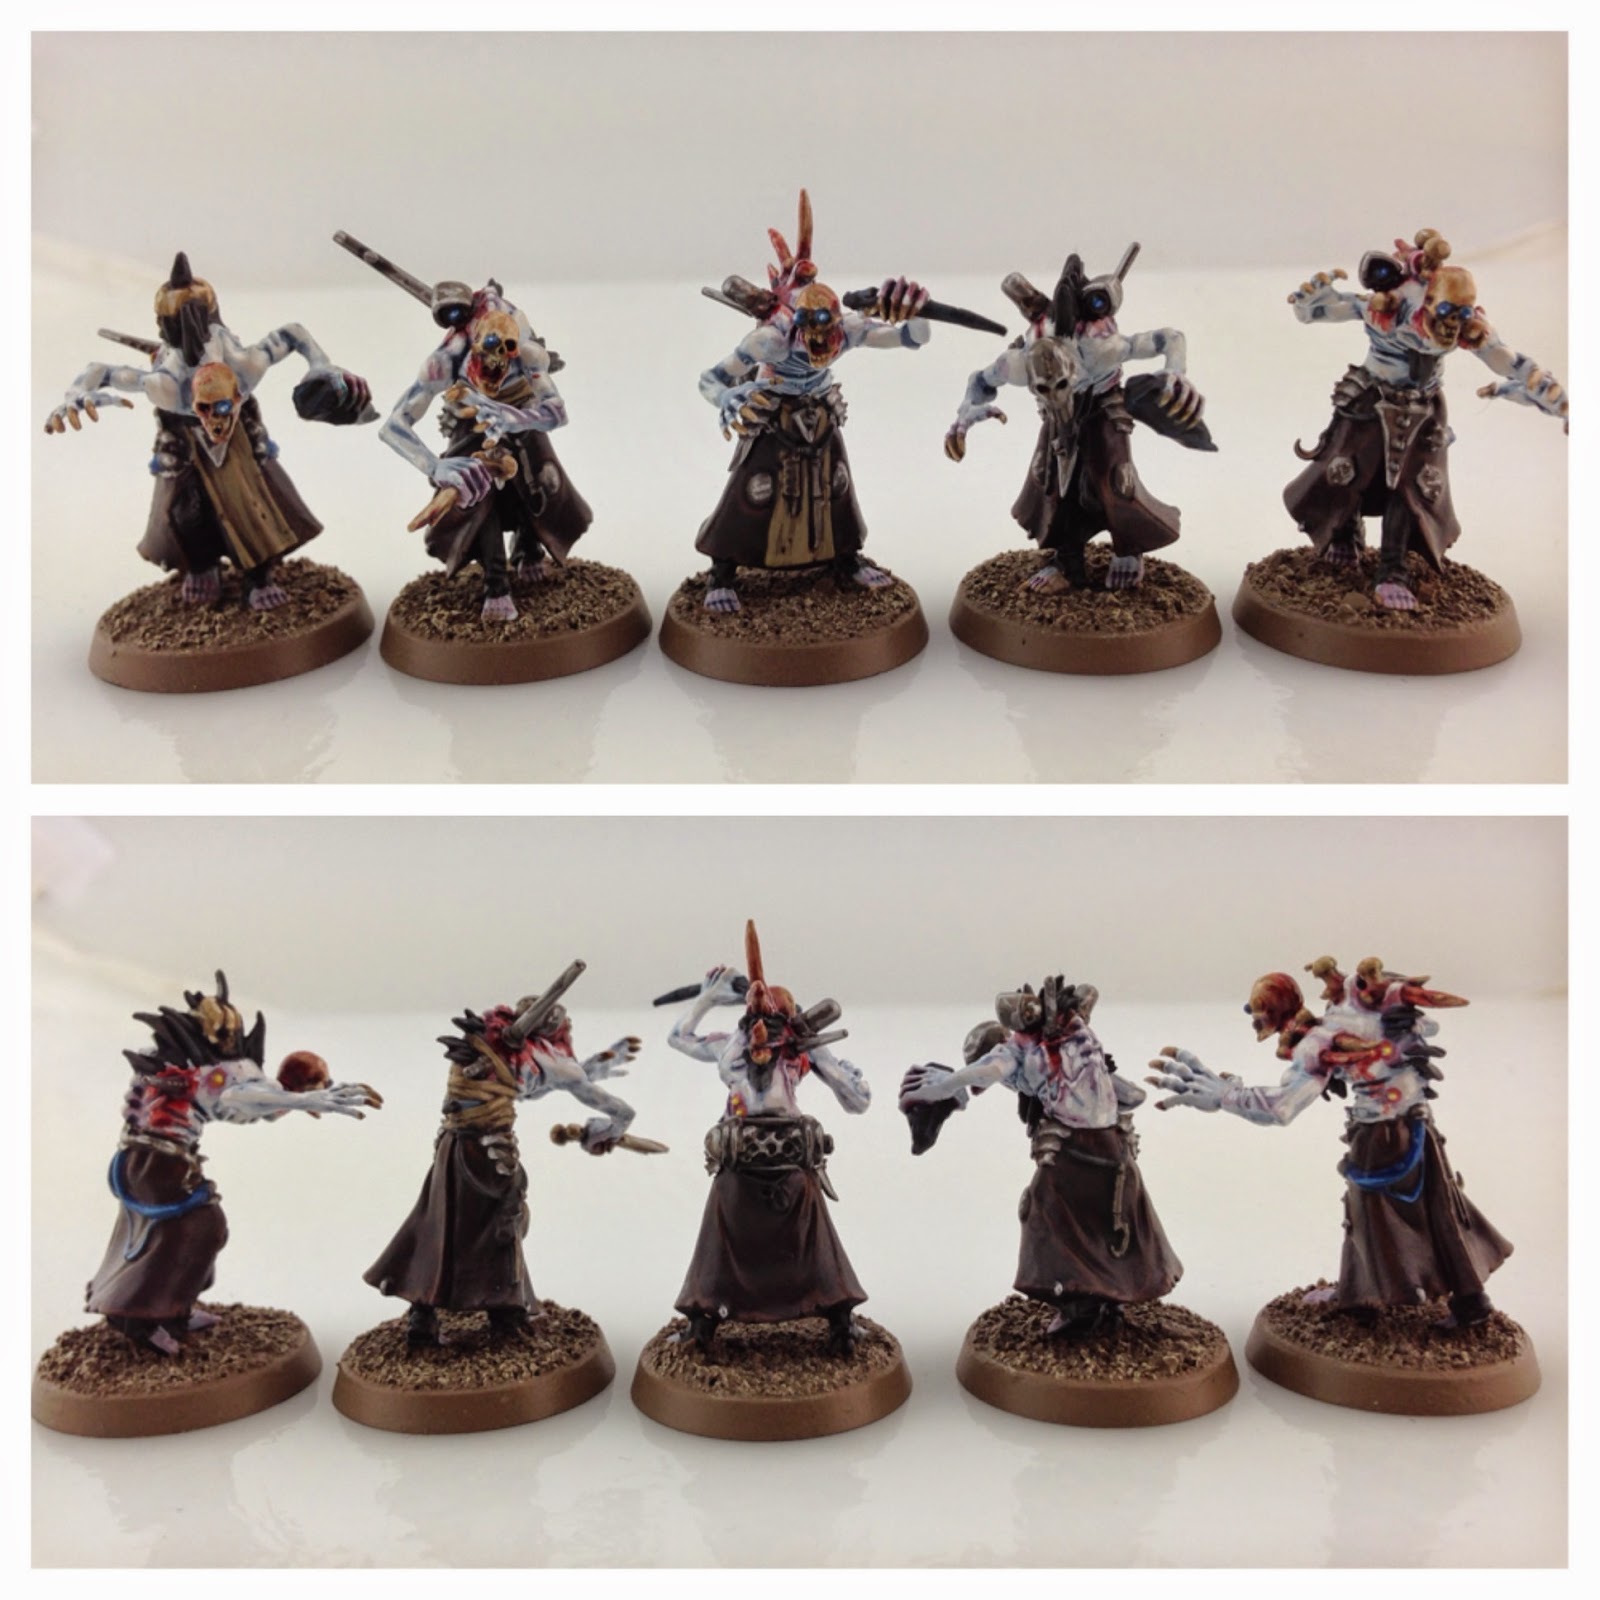
So after a dogs age... that Rogue Psyker Coven is finished.  Ok, 99.99% finished, I still need to put some static grass on the bases.  All the painting is finished though!  All I have now is the picture I cobbled together with my iPhone, it's not the best picture though.  My apologies.  I did shoot a batch of pictures earlier today with my DSLR and a photo-cube, but I'm having trouble with manual focusing and depth-of-field issues.  So those pictures were pretty terrible.  Most likely due to older eyes.  However, it did make me realize that I need a new camera with a nice autofocus that won't break the bank.  If anyone has any suggestions, let me know, I appreciate the input.

So here's the unit...

Have a turn will you?

A little bloody, but seeing how they are being used to be conduits for the Warp that my Black Legionnaires exploit... it seemed fitting.  In my mind, they were rounded up; festooned with Warp condensers and amplifiers with the resulting power surges melting their faces off when cursing/blasting what their masters point at.  Speaking of coruscating Warp energies... when these guys get possessed in game, I'll attach a sigil in the base to mark which ones are possessed.  Because last game was confusing trying to keep track of who was, or wasn't, possessed.  If you're familiar with the illustrator Wayne Douglas Barlow's work Inferno you'll have an idea of how it will look.  A demonic sigil as a halo right behind, or above, the head.  Now I just need to get some white base paint, and I'll be all set to do the rogue-witch flesh.  But before that guy, who is the big bad of my R&H, the Renegade Ogryns and their Hounds are ready to be finished.  Ogryns are past the black out stage, Hounds still need it, but all the flash is done.

One of Mr. Barlow's illustrations... I love his work.


There was a lot of good little discoveries for this batch of minis.  Namely... a good "leather", exposed bone, and unhealthy skin tone color recipes.  Sometimes I just paint, other times I'm really trying to make sure that I can repeat a certain result so I document the entire process to make sure of that.  Since these minis are the first lot of my R&H, I want to be able to repeat most of these results over the rest of the force.  If anyone wants to know how a certain area was done, just ask.  I don't mind sharing at all.  

I have to admit in all my years of painting minis, I never thought that white primer would be so nice to work with.  Prime white, do all the flesh tones with washes, black out everything else, and block in base colors.  It's been a little labor intensive, but it's been an enjoyable process for me.  I'm a very slow painter remember, but I really want to try that Spartan conversion... and I'm holding on to getting some painting done before I buy anything else.  The back log has been big for a bit, I'd like to knock some units out for a change.  

Sunday, March 1, 2015

Real quick Dreadclaw update... come fly with me...


Yesterday ended up being a really good day for hobby time as I was able to pretty much finish the Dreadclaw minus some bling.


As you can see there's a lot more plasticard from last time.  Basically it was really simple to trim a piece down to fit where the pods retro-thrusters would normally go.  I just traced the outline of the bottom on to the plastic, and then cut it a little big at first after measuring how much to trim off.  Then trim and check, trim and check, yadda, yadda.  The door for the bottom is from the old-old Rhino kits before the current version.  I also sawed out some replacement fins for the top out of some really thick plasticard, and the template I made earlier worked like a charm.  Add some tubes, stick some claws and tentacles in a few of those tubes for the Demonic Possession rule, some teeth-like protrusions... and presto.  One, mostly, finished Dreadclaw!

But then there was the whole thing about getting it onto a flying stand...


If you do a lot of modeling and don't have one of these, I really recommend that you get one.  This one was a little bit more expensive.  It's variable speed which came in handy, but the thing to remember is as long as you can change out bits you'll be fine.  This made cutting the hole for the flying stand go so much easier and faster.  By faster I mean about 40 minutes or so.  Doing it before hand, you know... before finishing the model, probably would've been better.  If I make another, now I know.


I ended up using the flying stand from my Heldrake to pencil out where I wanted to start cutting/drilling/modifying.  I had a 1/8" wide, ball cutting bit chucked into the Dremel and used short stokes to work the entire "cross".  One thing I should mention. I did use both halves of the door for the finished model, as I wanted something sturdy and more rigid.  This actually helps with the flying stand since you have more material to actually rest the pod on the stand with.  I had gone through the first layer of the door, taking my time, and checking the top of the stand to the hole often to see where it was and where it wasn't lining up.  Put the pod on the stand, and it was way too tippy as the area the stand rested in was just too shallow.  Only about 1/4" in depth.  So it was a simple matter of going through the inner part of the door, just like before.  Once both halves of the door were cut in, I switched bits to a 1/8" cylinder cutting bit.  This allowed me to really shave off just a little bit of plastic at a time on both halves of the door at the same time.  Again going slow, and not pushing really hard either.


There you have it, now my Dreadclaw can go into flying mode...


Or hover mode!

Now if I could just get a flying stand ordered, most places... including GW... seem to be out at the moment!


Thursday, February 26, 2015

IA:13 continues to inspire


Image from Forgeworld 

Well, what about those Dreadclaws?!  Seriously, an assault craft that is a dedicated transport for CSM or Chosen?  Sign.  Me.  Up.  This little baby gives me some flexibility on the battlefield while not competing for those all important Fast Attack slots... if those are really even a thing anymore.  Anyway... liking the rules, loving the concept, and not to happy with the FW pricing.  At 57 Pounds Sterling, that's ~$88 before the shipping.  Now I do love FW, I did get the collectors edition of IA:13, but thats a lot for something slightly larger than a normal stock GW Drop Pod.  So... I go looking for "dreadclaw conversion" and find this nifty article over at Dark Future Games that pretty much summed up what I wanted.  Exactly.  Their tutorial is spot on, and a fantastic start.  For my own Dreadclaw I pretty much followed it to the letter, but then I started looking at the all the other conversions as well.  They were all pretty much the same.  Make the pod, flip the fins.  Except I don't like how the fins look after they get flipped.  The fins look to splayed out, like they buckled a bit when they made impact and thats why they look a little "splayed".  Well, how could I change that and make a bunch of extra work in the process?  Simple!  Try and find the correct angle to flip the tips inward to look more like the Dreadclaw.  I think I got it to work out pretty well, let me know what you think.


Basically follow Dark Future Gaming's tut for the main hull assembly, and where to clip the fins initially.  After that, you're done.  Prime and paint!  It doesn't look bad at all really.  However, if you want to spice it up a bit... then please continue on.


So what it really comes down to is two cuts, sawing actually, and some spacing material.  Old sprue could do it as well, I just happen to have some plasticard from ancient days around to chop up.  Start with the yellow line first in the photo above.  Use the orange area of the stabilizer tip to find the approximate length you will need to for the end of the second cut.  Finally follow the blue line to make the second cut.  You may want to trim some of the servo arms for the fin off to make sawing easier.  Repeat x 5.


Then all you have to do is flip the stabilizer tip and glue.  Again, if you wanted to, you could stop right here and call it a day.  I added some spacing to help raise the whole pod a bit, and I even added tips from the "dozer" blade on the CSM Vehicle Sprue to jack it up a little more.  I wanted infantry models to be able to fit underneath it, so I needed it to be taller.

Fins at dry fit.

So there we have it.  This, to me, feels more like a Dreadclaw and I'm waiting on some bits to come to finish it up.  There's only a few more things to get planned out.  Adding some more stabilizer fins back to the top, and how to do the flying stand for it as well.


So here's the Photoshop mock up, and then the actual template for the construction of the top stabilizer fins.  

All in all, this has been a fun project and I *might* do another one.  My personal philosophy is that one might be good but a pair is better, but that's not always the case.  One of the best unit analysis posts for the Dreadclaw is here.  It's especially malisteen's post, #16, that really lays it out to not think of the Dreadclaw as a drop pod but more like a stripped down Storm Raven.  Great post.

That's it for now until those bits get here and I have a chance to wrap this project up and put it on the very large "to paint" shelf.